Wednesday, April 21, 2010
Tuesday, April 13, 2010
fruits and veggies

Strawberries are out at the farmer's market and pop up stands have started popping up all over the city. Most of the time I try to eat seasonally, even if strawberries and tomatoes are in the market in December. It doesn't mean that it's good for the soil or for me. I think we have seasonal foods for a reason. I get the vitamins I need in the winter with butternut squash and beets and kale and in the summer with tomatoes, strawberries, and zucchini. I like to enjoy the foods of the seasons. Aside from all of that, I couldn't help myself from picking up 3 pints of strawberries on Saturday. I've been eating them with yogurt in the morning and plain at night.
I've had this recipe on hand for a couple years now and finally got around to making it. It's out of Martha Stewart magazine and hers is definitely more beautiful than mine but I like the rustic look of it and it was absolutely delicious! I could have eaten the whole thing. It was just what I needed to get my tastebuds ready for summer.

Last weekend we (mostly Steve) did some yard work in preparation for the spring/summer planting season. We need to get our seeds going and in the ground which means we had to pull out the winter garden. The whole thing was kind of a mess. We let it go early on because most of our root veggies didn't have loose enough soil to really grow (live and learn) and the other Brassicas we had were eaten alive by aphids. We did get a head of cauliflower, some broccoli, and our artichokes are still going strong. There were lots of weeds and leftover vegetables to be pulled. I went to pull up the measly carrot tops and had to fight the soil a little and to my surprise a lovely carrot came up with it! I pulled them all up and was so excited to see that we had our own little surprise crop of sweet nantes carrots!

Steve cooked them up that night with some oil, garlic, and herbs and they were so delicious. Fresh picked that morning and in our bellies at night. This is how we like our fruits and veggies, fresh and sometimes in pastry form.

Wednesday, April 7, 2010
Frog Balls
This was my first attempt at home canning and in a week or so I will know exactly how the end result turned out. I tried to do some internet research on why they are called frog balls and I came across this story that states "they are round like meatballs and green like frogs, therefore they must be frog balls."
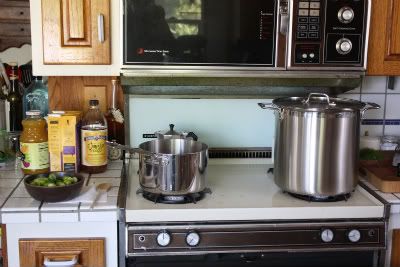
The process was super simple. I don't have a home canning set or anything of that nature, I just used what was available in my kitchen. Luckily we were given a beautiful new stock pot as a wedding gift (thanks Pop!) so I used this to sterilize the jars and can them. In another saucepot I steamed the brussel sprouts and also used this to simmer the brine. Other than that I just used a pair of tongs and some silicone pot holders.

The whole hands on time was probably an hour. After the jars had completely cooled I drew up a little label, put them through my xyron (turns them into stickers) and then they were done.

I absolutely can't wait to try them, and my hand at other pickled and canning projects. This summer I definitely want to make and can some tomato sauce from homegrown tomatoes. The art of canning and preserving is having a resurgence in the urban homesteading community. I am excited to see where this takes us. A pantry full of home canned goods!

And in other news, look at these gorgeous artichokes we have! I didn't think we would get any once I read that the plant has a 4 foot deep taproot and we didn't dig enough to let that grow but we have one large globe and 3 little babies! Maybe we should cut the big guy and let the energy be given to making more little guys.


The process was super simple. I don't have a home canning set or anything of that nature, I just used what was available in my kitchen. Luckily we were given a beautiful new stock pot as a wedding gift (thanks Pop!) so I used this to sterilize the jars and can them. In another saucepot I steamed the brussel sprouts and also used this to simmer the brine. Other than that I just used a pair of tongs and some silicone pot holders.

The whole hands on time was probably an hour. After the jars had completely cooled I drew up a little label, put them through my xyron (turns them into stickers) and then they were done.

I absolutely can't wait to try them, and my hand at other pickled and canning projects. This summer I definitely want to make and can some tomato sauce from homegrown tomatoes. The art of canning and preserving is having a resurgence in the urban homesteading community. I am excited to see where this takes us. A pantry full of home canned goods!

And in other news, look at these gorgeous artichokes we have! I didn't think we would get any once I read that the plant has a 4 foot deep taproot and we didn't dig enough to let that grow but we have one large globe and 3 little babies! Maybe we should cut the big guy and let the energy be given to making more little guys.

Monday, February 15, 2010
Bridal Shower
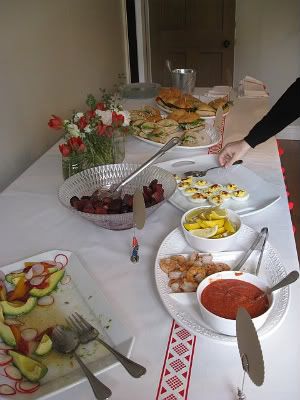
Better late than never...I guess. Instead of writing a lot of words I will just post some pictures of the shower.
The invite: gocco'd

the spread:
the dessert: delicious!
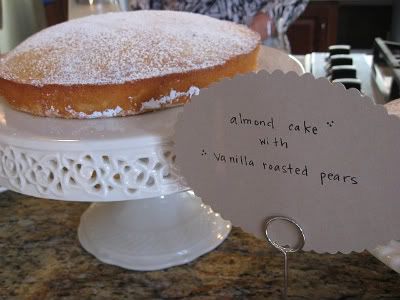
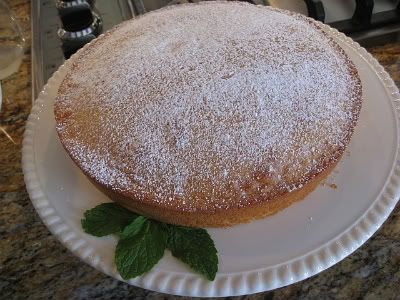
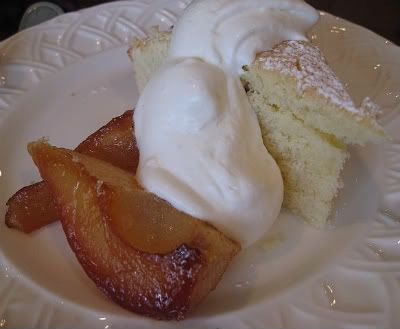
and the flowers: gorgeous


Thank you Lauren and Wayan for the photos!
The invite: gocco'd

the spread:

the dessert: delicious!


and the flowers: gorgeous


Thank you Lauren and Wayan for the photos!
Thursday, February 11, 2010
Happy Valentimes
I wanted an easy and fast way to make a few Valentine's cards. I first tried cutting out some paper hearts but they weren't doing it for me. Then I remembered the many times I have seen other wonderful crafty women (and men I'm sure) make stamps out of rubber erasers. So I took my crafting knife, drew a small heart on the top of a pencil eraser, and carved away.

It's so easy to make and the best part about it being a pencil is that it has a handle built right in. I am super happy with how it turned out and can't wait to find more uses for my little heart.


It's so easy to make and the best part about it being a pencil is that it has a handle built right in. I am super happy with how it turned out and can't wait to find more uses for my little heart.

Tuesday, February 2, 2010
Bridal Favors
My wonderful mother threw me a beautiful bridal shower a couple weekends ago. I will post more of the details later this week but I wanted to share the favors in their own post. I definitely wanted to help out with the shower and this was one way to do it.

I won't lie, every now and again I like to be the center of attention, but more often than not I don't. Now when you are the guest of honor at a bridal shower it's really hard to not be the center of attention. I wanted to make sure that every person who attended knew just how important they are to me and why I wanted them to be there. I decided to make a favor for everyone that would actually get used and not thrown into another drawer with the little bags of jordan almonds and similar things.

My mom and I decided to make tea towels. We found some linen that we liked, bought a few yards, and my mom cut and sewed all of them! She really is amazing. I knew from the beginning that I wanted to print on them using a lotus root and this is where things got tricky. I bought fabric paint which ended up being too thick and quite a disaster.
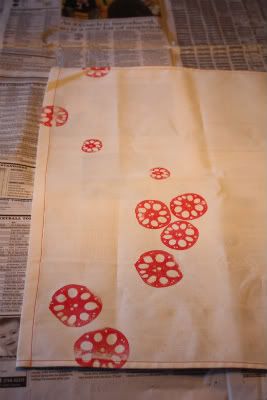
We then realized that using an ink pad would be the best option and give us the best print but the hard part was finding one that was a) good for fabric and b) permanent. We scoured the internet, called countless stores, and finally found the ink pad we needed. The only problem is we could only find one retailer in the area and they were still 15 miles away. The brand is VersaCraft if you ever find yourself in the same bind. We drove out there the next day and bought the ONLY red pad they had left. Printed, heat set, and ready to go!
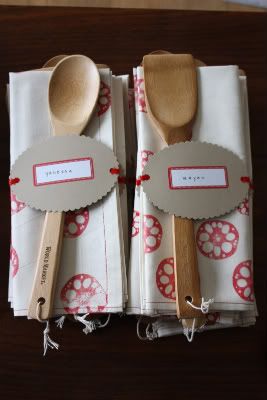
To finish it off, we added a wooden spoon and a label. On the back of each label I wrote a little note to each person. It was such a wonderful day and I can't wait to share the rest of the details!


I won't lie, every now and again I like to be the center of attention, but more often than not I don't. Now when you are the guest of honor at a bridal shower it's really hard to not be the center of attention. I wanted to make sure that every person who attended knew just how important they are to me and why I wanted them to be there. I decided to make a favor for everyone that would actually get used and not thrown into another drawer with the little bags of jordan almonds and similar things.

My mom and I decided to make tea towels. We found some linen that we liked, bought a few yards, and my mom cut and sewed all of them! She really is amazing. I knew from the beginning that I wanted to print on them using a lotus root and this is where things got tricky. I bought fabric paint which ended up being too thick and quite a disaster.

We then realized that using an ink pad would be the best option and give us the best print but the hard part was finding one that was a) good for fabric and b) permanent. We scoured the internet, called countless stores, and finally found the ink pad we needed. The only problem is we could only find one retailer in the area and they were still 15 miles away. The brand is VersaCraft if you ever find yourself in the same bind. We drove out there the next day and bought the ONLY red pad they had left. Printed, heat set, and ready to go!

To finish it off, we added a wooden spoon and a label. On the back of each label I wrote a little note to each person. It was such a wonderful day and I can't wait to share the rest of the details!

Thursday, January 28, 2010
Banded Together
My wedding band is finished and I wanted to share it with you all. I absolutely can't wait to wear it everyday.

This is the ring before . It was a ring my parents gave to me as a purity ring when I was a teenager. It wasn't really my style anymore but I wanted to turn in into something I would have forever.

(look at the beautiful packaging it came in, a little wooden box with a glass lid!)
I found Bario Neal a few months ago and decided to have them make my wedding band. They used the four diamonds from my original ring and recycled the gold for me.

They did an absolutely fabulous job and I am so deeply in love with it. It is perfect for me and I am so happy that it is something no one else will have and that the diamonds are so personal to me. Bario Neal uses all recycled metals and ethically mined gems and they donate some of their profit to charity (and are super reasonably priced to begin with).

They even have my ring on their website under custom work right here.

This is the ring before . It was a ring my parents gave to me as a purity ring when I was a teenager. It wasn't really my style anymore but I wanted to turn in into something I would have forever.

(look at the beautiful packaging it came in, a little wooden box with a glass lid!)
I found Bario Neal a few months ago and decided to have them make my wedding band. They used the four diamonds from my original ring and recycled the gold for me.

They did an absolutely fabulous job and I am so deeply in love with it. It is perfect for me and I am so happy that it is something no one else will have and that the diamonds are so personal to me. Bario Neal uses all recycled metals and ethically mined gems and they donate some of their profit to charity (and are super reasonably priced to begin with).

They even have my ring on their website under custom work right here.
Wednesday, January 27, 2010
Cordially Invited
I know I haven't blogged in almost 2 months but lets just pretend that never happened. I promise to get back into the routine. New year, new camera, new events.
From the beginning we knew that we wanted to do all of our save the dates and invites ourselves. This turned out to be a lot of stress but totally worth it. The save the dates weren't that difficult but the invitations turned out to be quite the project.
I gocco'd the reply cards first and they were simple and painless and turned out perfect.

Then came the invitations themselves. Now the problem that I ran into was completely my own fault. I made the image just a tad larger than is recommended and realized that the size limit is there for a reason. I had to jimmy-rig my gocco with cardboard siding to allow for a larger surface area to print onto. It was quite the nightmare for a couple hours but it all worked out and we were able to print exactly the number we needed.

I did take the design from another source but I did hand draw it myself. The fonts were free from dafont. All gocco'd in a row!

I would have loved to have all of the addresses hand calligraphed but in the end it is way out of our budget and most people toss em in the trash anyway. So I just went with labels from Paper Source and they made me just as happy.

(more on the Obama's invitation later)
From the beginning we knew that we wanted to do all of our save the dates and invites ourselves. This turned out to be a lot of stress but totally worth it. The save the dates weren't that difficult but the invitations turned out to be quite the project.
I gocco'd the reply cards first and they were simple and painless and turned out perfect.

Then came the invitations themselves. Now the problem that I ran into was completely my own fault. I made the image just a tad larger than is recommended and realized that the size limit is there for a reason. I had to jimmy-rig my gocco with cardboard siding to allow for a larger surface area to print onto. It was quite the nightmare for a couple hours but it all worked out and we were able to print exactly the number we needed.

I did take the design from another source but I did hand draw it myself. The fonts were free from dafont. All gocco'd in a row!

I would have loved to have all of the addresses hand calligraphed but in the end it is way out of our budget and most people toss em in the trash anyway. So I just went with labels from Paper Source and they made me just as happy.

(more on the Obama's invitation later)
Subscribe to:
Comments (Atom)
